


Equipped with precision-focused and modernized technologies, these heat press offer unmatched services and come with low maintenance costs. Xinhong EasyTrans™ heat press machines are widely used in the printing industry due to their varied uses and high-quality printing works that they can perform. Regardless of what surface you are printing on, these heat press can perform equally well over all types of surface areas. These heat press can be used in several places such as manufacturing plants, residences, construction works, retail shops, printing houses and many more due to the A grade-quality print ink they work with.
Dual platen automatic heat press (Model # B2-2N Smart) is V3.0 version and updated based on B2-2N Basic and more user friendly and smart.
This electronic heat press is the top-of-the-line machine when it comes to mass production at high quality levels. This unit can handle anything – large or small garments, multiple ceramic tiles, and many other substrates. It does not require compressed air, which makes it more convenient. It features high efficiency & excellent pressure, can operate in full-auto, or semi-auto modes. With the multi-timers and foot pedal, users can make perfect job. This Easy-trans Smart level heat press has twin lower plates and could be semi-auto or fully automatic in a single switch. This electric heat pres is featured with a HMI/ PLC gauge, so user could control its shuttle moving speed, also able to have a trouble shooting when it’ s necessary. If user need to work with different size substrates, quick optional platen would be a good proposals, we’ve different platens and video uploaded on YouTube, here is the link, https://www.youtube.com/watch?v=T9yZXo6qkBk
As for Ultra Automatic Heat Press Machine (Model # B2-2N Smart), detailed introduction as bellow, if there is anything unclear, please email contact by sales@xheatpress.com or Whatsapp/Wechat contact by 86-150 6088 0319.
1.Control Panel Introduction
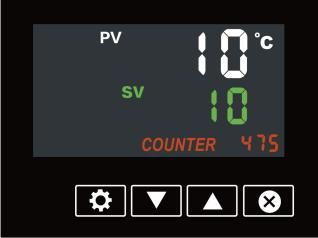
Control Panel Window
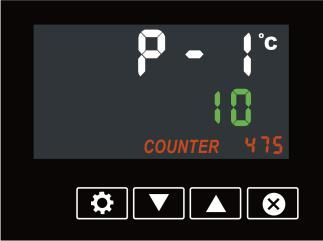
P-1: Temperature Setting
Touch SET button, continue with ▲/▼ button to set a desired temperature.
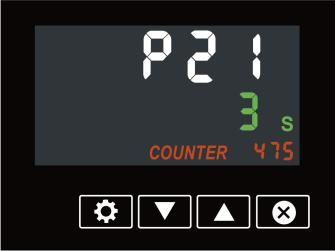
P-21: Timer 1 Setting (Pre-press)
Touch SET button, continue with ▲/▼ button to set a desired timer 1
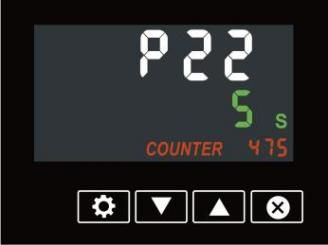
P-22: Timer 2 Setting (Heat Press)
Touch SET button, continue with ▲/▼ button to set a desired timer 2
● Tip: Set P-22 data in 0 if Timer 2 is no required
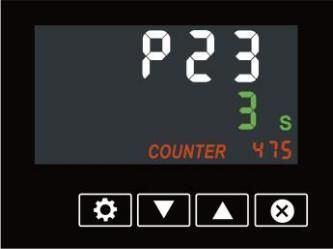
P-23: Timer 3 Setting (Reinforced Press)
Touch SET button, continue with ▲/▼ button to set a desired timer 3
● Tip: Set P-23 data in 0 if Timer 3 is no required

P-3: °C/°F Temperature Read-out
Touch SET button, continue with ▲/▼ button to set a read-out

P-4: Pressure Setting
Touch SET button, continue with ▲/▼ button to set a desired pressure
● Tip: Pressure increases as P-4 data increases.
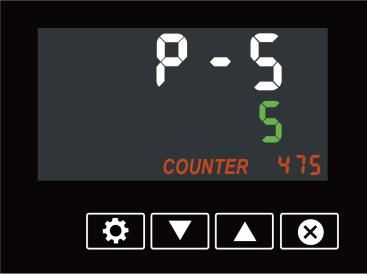
P-5: Standby Mode Timer Setting
Touch SET button, continue with ▲/▼ button to set a standby timer.
● Tip: Machine enters into standby mode when it’s not in use for P-5 period and reads OFF.
Heat platen stops heating and cools down. Control button touch waken up machine and heat platen heats up.
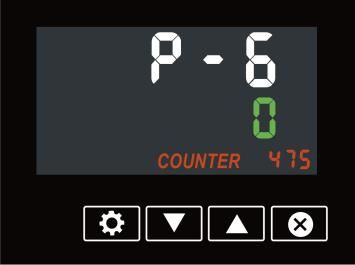
P-6: Multi-timer Switch
Touch SET button, continue with ▲/▼ button to set multi-timer, touch SET button to complete all settings.
Tip: P-6 read-out in 0, refers to single timer applied.
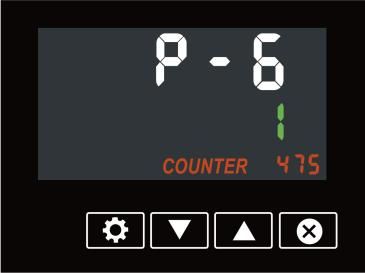
Tip: P-6 read-out in 1, refers to triple timers, usually applied to single platen. (i.e. timer 1 - timer 2 - timer 3)

Tip: P-6 read-out in 2, refers to triple timers and repeated, usually applied to dual platens. (i.e. timer 1 - timer 1 - timer 2 - timer 2 - timer 3 - timer 3)
2.Initial Position
Left Side as an initial position, user dual fingers click the start buttons (green buttons) get 2 results.
1.Heat platen returns to left side after click, next click makes heat platen close down.
2.Heat platen closes down if it’s already at initial left side.
3.Operation Introduction
Semi-auto Mode (Switch to Manual), green buttons control heat platen close and raise, pedal control heat platen shuttle between left & right station.
Automatic Mode (Switch to Auto), green buttons click to start the automatic mode according to the control system. (Tip: Pedal is disabled in Auto Mode.)
4.Dual Finger Click Mode
Heat platen closes when dual fingers click the green buttons, fingers are allowable to be released unless heat platen is closed firmly, otherwise heat platen will raise up.
5.Quick Release Button
Pause the release button, shuttle stops and heat platen raises up. After release button is reset and green buttons are clicked, heat platen will return back to initial left station as it may need.
6.Shuttle Speed
Heat platen shuttle speed control by the speed valve on machine body - Bottom Right
7.Pedal Control
Pedal control by one foot touch rather than long hold touch.
8.Connectors
Pedal connector and laser alignment switch are located on machine body - Right Front
9.Machine Parts Introduction
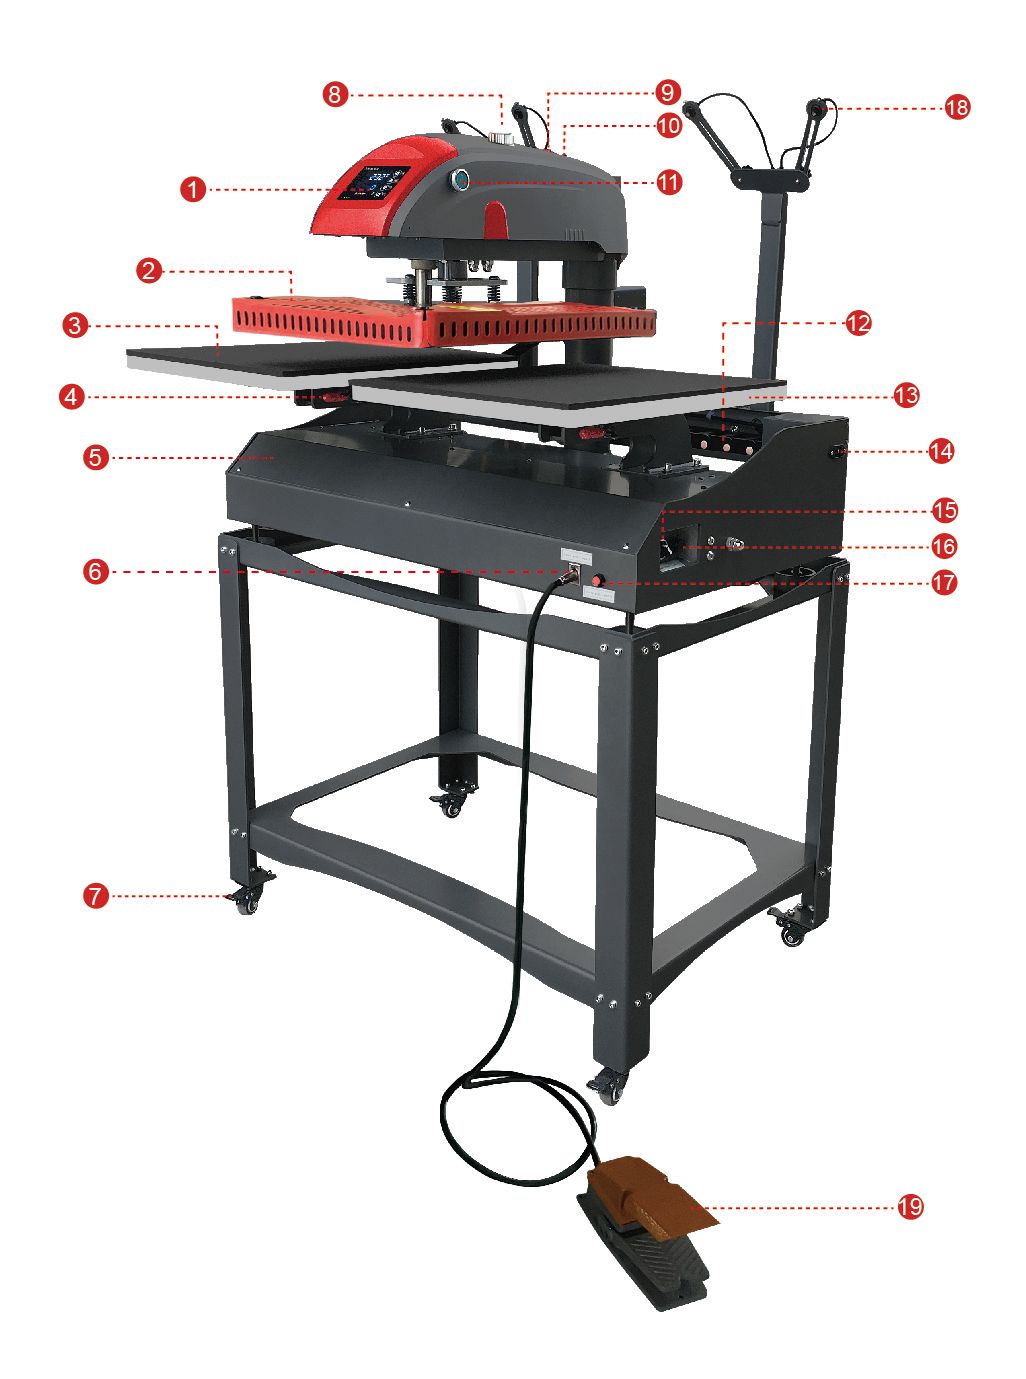
1. Control Display
2. Heating Platen
3. Silicon Mat × 2
4. Quick Changeable Device
5. Machine Frame
6. Pedal Switch
7. Brake Caster
8. Quick Release Button
9. Power Switch
10. Thermal Breaker × 2
11. Operation Button × 2
12. Tank Chain
13. Lower Plate × 2
14. Power Plug
15. Manual/Auto-Switch
16. Shuttle Speed Controller
17. Laser Power Supply
18. Laser location
19. Pedal
Post time: Mar-03-2022
 86-15060880319
  sales@xheatpress.com